BOM
定时器和延时器
setInterval():循环调用。将一段代码,每隔一段时间执行一次。(循环执行)
setTimeout():延时调用。将一段代码,等待一段时间之后****再执行。(只执行一次)
**备注:**在实际开发中,二者是可以根据需要,互相替代的。
定时器setInterval()
setInterval()函数可以重复调用一个函数,在每次调用之间具有固定的时间间隔
js
 setInterval(function(){},2000) //这个函数自动被以固定间隔时间调用
//第一个参数是函数
//第二个参数是间隔时间 以毫秒为单位  1000毫秒 === 1秒
方式一:匿名函数
每间隔一秒,将 数字 加1:
js
let num = 1;
setInterval(function () {
    num ++;
    console.log(num);
}, 1000);
方式二:
js
let num = 1;
function fn() {
    num ++;
    console.log(num);
}
setInterval(fn,1000); //具名函数注意这里不要加()圆括号
函数的参数
setInterval()函数可以接收第3、4.......个参数,它们将按顺序传入函数
js
setInterval(function(a , b){
    console.log(a+b);
} , 1000 , 10, 20);
//从第三个参数开始,表示传入函数内的参数


//具名函数传参
let num = 1;
function fn(a, b) {
    num++;
    console.log(num);
    console.log(a + b);
}

setInterval(fn, 1000, 10, 20);
清除定时器
**clearInterval()**函数可以清除一个定时器
定时器的返回值是作为这个定时器的唯一标识,可以用来清除定时器
假设定时器setInterval()的返回值是
参数1,那么clearInterval(参数1)就可以清除定时器。clearTimeout()函数可以清除延时器 和clearInterval()函数道理是一样的
代码举例1
html
<script>
    let num = 1;

   	let timer = setInterval(function () {
        console.log(num);  //每间隔一秒,打印一次num的值
        num ++;
        if(num === 5) {  //打印四次之后,就清除定时器
            clearInterval(timer);
        }

    }, 1000);
</script>
代码举例2
setInterval容易造成事件堆积,当时间太短事件执行不过来
html
<body>
    <h1 id="info">0</h1>
    <input type="button" id="start" value="开始" />
    <input type="button" id="end" value="暂停" />

    <script>
      let oInfo = document.getElementById("info");
      let oStart = document.getElementById("start");
      let oEnd = document.getElementById("end");

      let a = 0;
      // 全局变量
      let timer;

      oStart.onclick = function () {
        // 为了防止定时器叠加,我们应该在设置定时器之前先清除定时器
        clearInterval(timer);
        // 更改全局变量timer的值为一个定时器实体
        timer = setInterval(function () {
          oInfo.innerText = ++a;
        }, 1000);
      };

      oEnd.onclick = function () {
        clearInterval(timer);
      };
    </script>
  </body>
延时器setTimeout()
setTimeout()函数可以设置一个延时器,当指定时间到了之后,会执行函数一次,不再重复执行。
js
setTimeout(function(){
    //这个函数会在2秒之后执行一次
},2000)
// 参数1:回调函数,该函数会每隔一段时间被调用一次。
// 参数2:每次调用的间隔时间,单位是毫秒。
代码举例1
js
setTimeout(function() {
    console.log(1); // 3秒之后,再执行这段代码。
}, 3000);
代码举例2
html
<body>
    <input type="button" id="btn1" value="2秒后弹出你好">
    <input type="button" id="btn2" value="取消弹出">

    <script>
        let btn1 = document.getElementById("btn1");
        let btn2 = document.getElementById("btn2");
        let timer;

        btn1.onclick = function () {
            timer = setTimeout(function () {
                alert("您好");
            }, 2000);
        };
        btn2.onclick = function(){
            clearTimeout(timer);
        }
    </script>
setTimeout() 举例:5秒后关闭网页两侧的广告栏
假设网页两侧的广告栏为两个img标签,它们的样式为:
html
<style>
    ...
    ...

</style>
5秒后关闭广告栏的js代码为:
html
<script>
    window.onload = function () {
        //获取相关元素
        let imgArr = document.getElementsByTagName("img");
        //设置定时器:5秒后关闭两侧的广告栏
        setTimeout(fn,5000);
        function fn(){
            imgArr[0].style.display = "none";
            imgArr[1].style.display = "none";
        }
    }
</script>
通过setInterval方法实现网页动画的例子。
html
<style>
    #someDiv {
width: 200px;
height: 200px;
background-color: pink;
}
    </style>
</head>
<body>
        <div id="someDiv"></div>

<script>
            let div = document.getElementById("someDiv");
let opacity = 1;
let fader = setInterval(function () {
    opacity -= 0.1;
    if (opacity >= 0) {
        div.style.opacity = opacity;
    } else {
        clearInterval(fader);
    }
}, 1000);
</script>
小练习
js
let num = 0;
let max = 10;

//每隔一秒钟num递增一次 , 直到num的值大于等于Max清除
let timer = setInterval(function () {
    num++;
    console.log(num);
    if (num >= max) {
        clearInterval(timer);
    }
}, 1000);
如果要多次调用,可以让code自身再次调用setTimeout ()
js
let num = 0;
let max = 10;
function increaseNum() {
    num++;
    console.log(num);
    if (num >= max) {
        clearTimeout(increaseNum);
    } else {
        setTimeout(increaseNum, 1000);
    }
}
setTimeout(increaseNum, 1000);
初步认识异步语句
JavaScript是单线程语言,
单线程就是所执行的代码必须按照顺序。
基于JS是单线程语言
setInterval()和setTimeout()是两个异步语句
异步(asynchronous) :不会阻塞CPU继续执行其他语句,当异步完成时,会执行“回调函数”(callback)
异步不会阻塞代码执行
同步会阻塞代码执行
代码举例1
html
<script>
    console.log(100);
    setTimeout(function(){
        console.log(200);//回调函数
    },1000);//异步语句  异步语句不会阻塞程序的正常执行
    console.log(300);

    //先打印100 300 等待1秒之后再执行200
</script>
setTimeout 笔试题
js
console.log(1)
setTimeout(function(){
    console.log(2)
} ,1000)
console.log(3)
setTimeout(function () {
    console.log(4)
},0)
console.log(5)
js
//同步
console.log(100);
alert(200);
console.log(300);
//先打印100 弹出200 点击确定后打印300
使用定时器实现动画
使用定时器可以实现动画,利用的就是“视觉暂留”原理
使用定时器实现动画较为不便:
1.不方便根据动画总时间计算步长
2.运动方向要设置正负
3.多种运动进行叠加较为困难(比如一个方形一边移动—边变为圆形)
举例
按下按钮盒子移动
html
<style>
    #box {
        position: absolute;
        top: 100px;
        left: 100px;
        width: 100px;
        height: 100px;
        background-color: orange;
    }
</style>
</head>
<body>
    <input type="button" id="btn" value="开始运动" />

    <div id="box"></div>

    <script>
        let oBtn = document.getElementById("btn");
        let oBox = document.getElementById("box");

        // 全局变量盒子的left值
        let left = 100;

        oBtn.onclick = function () {
            //改变全局变量
            let timer = setInterval(function () {
                // 改变全局变量
                // 两千毫秒之内移动一千像素
                left += 10;

                if (left >= 1100) {
                    clearInterval(timer);
                }

                oBox.style.left = left + "px";
            }, 20);
        };
    </script>
</body>
JS和CSS3结合实现动画
我们知道,CSS3的transition过渡属性可以实现动画
JavaScript可以利用CSS3的transition属性轻松实现元素
JS和CSS3结合实现动画规避了定时器制作动画的缺点
改写之前的代码
html
<body>
    <input type="button" id="btn" value="开始运动" />

    <div id="box"></div>

    <script>
      let oBtn = document.getElementById("btn");
      let oBox = document.getElementById("box");

      // 全局变量盒子的left值
      let left = 100;

      oBtn.onclick = function () {
        oBox.style.transition = "2s ease";
        oBox.style.left = "1100px";
      };
    </script>
如果我们想再次点击按钮盒子往左边来移动
html
<style>
    #box {
        position: absolute;
        top: 100px;
        left: 100px;
        width: 100px;
        height: 100px;
        background-color: orange;
    }
</style>
</head>
<body>
    <input type="button" id="btn" value="开始运动" />

    <div id="box"></div>

    <script>
        let oBtn = document.getElementById("btn");
        let oBox = document.getElementById("box");

        // 全局变量盒子的left值
        let left = 100;

        // 标识量 指示当前盒子在左边还是右边
        let pos = true; //true左边 false右边

        oBtn.onclick = function () {
            //把过渡加上
            oBox.style.transition = "2s ease";
            if (pos == true) {
                //瞬间移动 但是有过渡 就有动画
                oBox.style.left = "1100px";
                pos = false;
            } else if (pos == false) {
                oBox.style.left = "100px";
                pos = true;
            }
        };

        //代码改进一下
        oBtn.onclick = function () {
            oBox.classList[pos ? "add" : "remove"]("move-left");
            pos = !pos
        }
函数节流
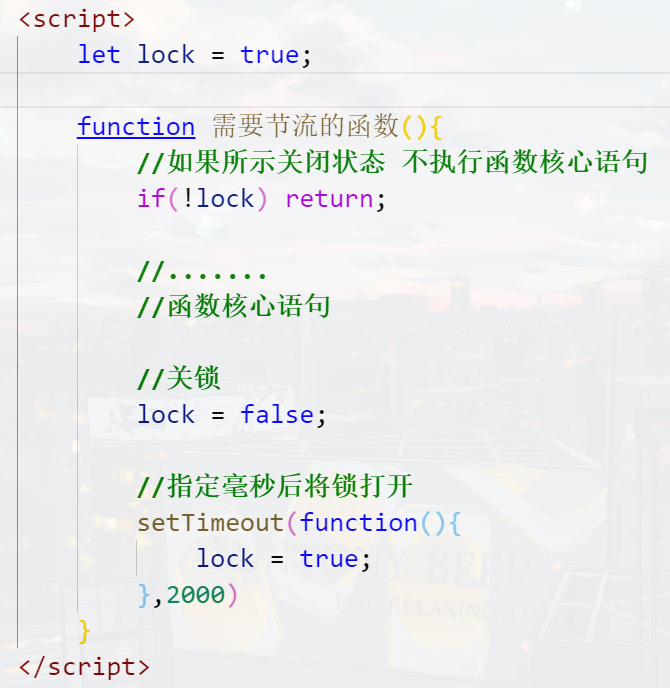
函数节流:一个函数执行一次后,只有大于设定的执行周期后才允许执行第二次
函数节流非常容易实现,只需要借助setTimeout()延时器
代码公式
html
<style>
    #box {
        position: absolute;
        top: 100px;
        left: 100px;
        width: 100px;
        height: 100px;
        background-color: orange;
        transition: 2s ease;
    }

    #box.move-left {
        left: 1100px;
    }
</style>
</head>
<body>
    <input type="button" id="btn" value="开始运动" />

    <div id="box"></div>

    <script>
        let oBtn = document.getElementById("btn");
        let oBox = document.getElementById("box");

        // 全局变量盒子的left值
        let left = 100;

        // 标识量 指示当前盒子在左边还是右边
        let pos = true; //true左边 false右边

        let lock = true;
        oBtn.onclick = function () {
            // 首先检查锁是否关上
            if (!lock) return;

            oBox.classList[pos ? "add" : "remove"]("move-left");
            pos = !pos;

            // 关锁
            lock = false;

            //两秒后开锁
            setTimeout(function () {
                lock = true;
            }, 2000);
        };
    </script>
</body>
无缝连续滚动特效
html
<style>
    * {
        margin: 0;
        padding: 0;
    }
    ul {
        list-style: none;
    }

    #wrap {
        overflow: hidden;
        width: 850px;
        border: 4px solid #000;
        margin: 50px auto;
    }

    #wrap ul {
        position: relative;
        display: flex;
        width: 5000px;
    }

    #wrap ul li {
        margin-right: 10px;
    }
</style>
</head>
<body>
    <div id="wrap">
        <ul id="list">
            <li>
                <img src="https://s1.ax1x.com/2020/10/11/0g5pVO.th.png" alt="" />
            </li>
            <li>
                <img src="https://s1.ax1x.com/2020/10/11/0g5FGd.th.png" alt="" />
            </li>
            <li>
                <img src="https://s1.ax1x.com/2020/10/11/0g5udS.th.png" alt="" />
            </li>
            <li>
                <img src="https://s1.ax1x.com/2020/10/11/0g5YLV.th.png" alt="" />
            </li>
            <li>
                <img src="https://s1.ax1x.com/2020/10/11/0g5aoF.th.png" alt="" />
            </li>
            <li>
                <img src="https://s1.ax1x.com/2020/10/11/0g50JJ.th.png" alt="" />
            </li>
        </ul>
    </div>

    <script>
        let oWrap = document.getElementById("wrap");
        let oList = document.getElementById("list");

        //复制多一遍所有的li
        list.innerHTML += list.innerHTML;

        //全局变量 表示当前list的left值
        let left = 0;

        //定时器变量
        let timer;

        move();

        //设置定时器
        function move() {
            // 设表先关
            clearInterval(timer);

            timer = setInterval(function () {
                left -= 4;

                //验收
                if (left < -1010) {
                    left = 0;
                }

                oList.style.transform = `translateX(${left}px)`;
            }, 20);
        }

        // 鼠标进入停止定时器
        oWrap.onmouseenter = function () {
            clearInterval(timer);
        };
        // 鼠标进入离开定时器
        oWrap.onmouseleave = function () {
            move();
        };
    </script>
</body>
跑马灯轮播图
html
<!DOCTYPE html>
<html lang="en">
<head>
<meta charset="UTF-8" />
<meta name="viewport" content="width=device-width, initial-scale=1.0" />
<title>Document</title>
<style>
* {
margin: 0;
padding: 0;
}
#wrap {
overflow: hidden;
position: relative;
width: 1226px;
height: 580px;
margin: 200px auto 0;
}
#wrap .imglist {
position: relative;
left: 0;
display: flex;
width: 100%;
height: 100%;
transition: 0.7s ease;
}
#wrap .imglist img {
width: 100%;
height: 100%;
cursor: pointer;
}
#wrap a {
position: absolute;
top: 50%;
transform: translate(0, -50%);
display: block;
width: 40px;
height: 70px;
background-color: rgba(0, 0, 0, 0.7);
color: white;
user-select: none;
font-size: 30px;
text-align: center;
line-height: 70px;
text-decoration: none;
}
#wrap a.left {
left: 0;
}
#wrap a.right {
right: 0;
}
</style>
</head>
<body>
<div id="wrap">
<div class="imglist">
<img src="https://s1.ax1x.com/2020/09/26/0irm1P.jpg" alt="" />
<img src="https://s1.ax1x.com/2020/09/26/0irQ0g.jpg" alt="" />
<img src="https://s1.ax1x.com/2020/09/26/0ir8ts.jpg" alt="" />
<img src="https://s1.ax1x.com/2020/10/11/0gbKoV.jpg" alt="" />
<img src="https://s1.ax1x.com/2020/10/11/0gb7Os.jpg" alt="" />
</div>
<div class="arrow">
<a href="javascript:;" class="left"><</a>
<a href="javascript:;" class="right">></a>
</div>
</div>
<script>
//得到按钮和图片列表整体进行运动
let oLeft = document.querySelector("#wrap .arrow .left");
let oRight = document.querySelector("#wrap .arrow .right");
let oImgList = document.querySelector("#wrap .imglist");
let cloneImg = oImgList.firstElementChild.cloneNode();
oImgList.appendChild(cloneImg);
// 当前ul显示到第几张了,从0开始数
let index = 0;
// 节流锁
let lock = true;
oRight.onclick = function () {
// 判断锁的状态
if(!lock) return;
//给list加过渡,为什么要加? ? css中不是已经加了么??这是因为最后一张图片会把过渡去掉
oImgList.style.transition = "0.7s ease";
index++;
if (index > 4) {
//设置一个延时器,延时器的功能就是将ul瞬间拉回0的位置,延时器的目的就是让动画结束之后
setTimeout(function () {
//取消掉过渡,因为要的是瞬间移动,不是“咕噜”回去
oImgList.style.transition = "none";
oImgList.style.left = 0;
index = 0;
}, 700);
}
oImgList.style.left = -index * 1226 + "px";
lock = false;
// 函数节流
setTimeout(function(){
lock = true;
},700)
};
oLeft.onclick = function () {
// 判断锁的状态
if(!lock) return;
//判断是不是第0张,如果是,就要瞬间用假的替换真的
if (index == 0) {
//取消掉过渡,因为要的是瞬间移动,不是“咕噜”过去
oImgList.style.transition = "none";
oImgList.style.left = -5 * 1226 + "px";
//设置一个延时器,这个延时器的延时时间可以是0毫秒,虽然是0毫秒,但是可以让我们 过渡先是瞬间取消,然后再加上
setTimeout(function () {
//加过渡
oImgList.style.transition = "0.7s ease";
//idx改为真正的最后一张图片的编号
index = 4;
oImgList.style.left = -4 * 1226 + "px";
}, 0);
} else {
index--;
oImgList.style.left = -index * 1226 + "px";
}
lock = false;
// 函数节流
setTimeout(function(){
lock = true;
},700)
};
</script>
</body>
</html>
Math.random() 0<=r<1 随机小数
从min~max之间取随机整数:
Math.floor(Math.random()*(max-min+1)+min)
从0~n之间去随机: Math.floor(Math.random()*(n+1));
随机色卡
html
<style>
    #wrap p {
        float: left;
        width: 150px;
        height: 30px;
        margin: 3px;
        text-align: center;
        line-height: 30px;
        color: #fff;
        font-size: 12px;
        font-weight: bold;
    }
</style>
</head>
<body>
    <div id="wrap"></div>

    <script>


        (function () {
            let oWrap = document.getElementById("wrap");

            function RandomColorCard() {
                let r = parseInt(Math.random() * 256);
                let g = parseInt(Math.random() * 256);
                let b = parseInt(Math.random() * 256);
                console.log(r,g,b);

                let oP = document.createElement("p");

                oP.innerHTML = `<p style="background-color:rgb(${r},${g},${b})"> rgb(${r},${g},${b}) </p>`;

                oWrap.appendChild(oP);
            }

            setInterval(RandomColorCard, 500);
        })();
    </script>
html
<style>
    #wrap {
        position: relative;
        width: 500px;
        height: 500px;
        border: 1px solid orange;
        border-radius: 50%;
        margin: 50px auto 0;
        /*animation: roll 3s linear infinite;*/
    }

    #wrap .circle {
        position: absolute;
        top: 0;
        left: 50%;
        width: 30px;
        height: 30px;
        background-color: pink;
        border-radius: 50%;
        margin-top: -15px;
        margin-left: -15px;
    }

    /*@keyframes roll {
    from{
    transform: rotate(0deg);
    }
    to{
    transform: rotate(360deg);
    }
    }*/
</style>
</head>
<body>
    <div id="wrap">
        <p class="circle"></p>
    </div>

    <script>
        let oWrap = document.getElementById("wrap");

        let r = 0;
        setInterval( () => {
            r += 1;
            oWrap.style.transform = `rotate(${r}deg)`;
        }, 1000 / 60);

        //function rotate() {
        //  r += 5;
        //  oWrap.style.transform = `rotate(${r}deg)`;
        //  requestAnimationFrame(rotate);
        //}

        //rotate();
    </script>
BOM是什么
window对象是当前JS脚本运行所处的窗口,而这个窗口中包含DOM结构,window.document属性就是document对象
在有标签页功能的浏览器中,每个标签都拥有自己的window对象;也就是说,同一个窗口的标签页之间不会共享一个 window对象
全局变量会成为window对象的属性
js
var a = 10;
console.log(window.hasOwnProperty("a")); //true
console.log(window.a == a);  //true
这就意味着,多个js文件之间是共享全局作用域的,即js文件没有作用域隔离功能
内置函数普遍是window的方法
如setlnterval()、alert()等内置函数,普遍是window的方法
js
console.log(window.hasOwnProperty("alert")); //true
console.log(window.hasOwnProperty("setTimeout")); //true

window.setInterval(function () {
    window.console.log('你好');
	},1000);
}
获得不包含滚动条的窗口宽度
document.documentElement.clientWidth
js
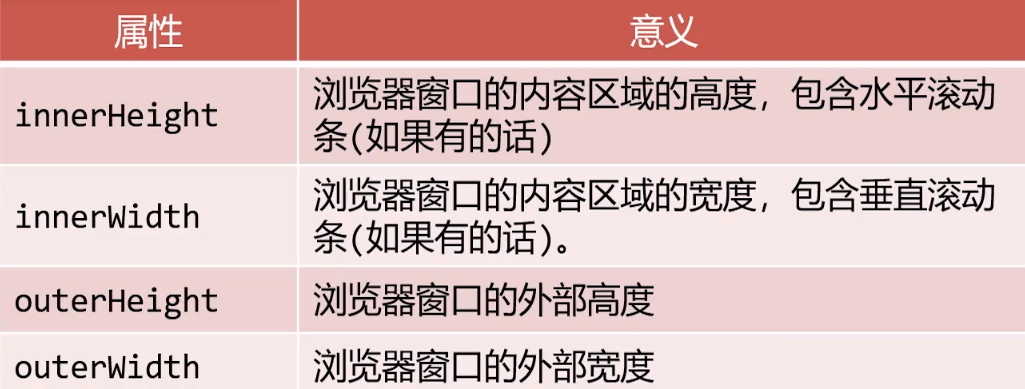
console.log("窗口的内宽(包含滚动条)" + window.innerWidth );
console.log("窗口的内宽(不含滚动条)" + document.documentElement.clientWidth );
console.log("窗口的外宽" + window.outerWidth );
resize事件
在窗口大小改变之后,就会触发resize事件,
可以使用window.onresize或者window.addEventListener('resize')来绑定事件处理函数
js
window.onresize = function () {
    let root = document.documentElement;
    console.log("窗口尺寸改变了", root.clientWidth, root.clientHeight);
};
window.close
Window对象的方法
html
<input type="button" value="退 出" id="quit">

<script>
var quit = document.getElementById("quit");

quit.onclick = function () {
    window.close();
}
</script>
js
setTimeout(function(){
	window.close();
},2000)
onfocus/onblur
onfocus - 进入当前标签页时触发(包括切换标签页,从任务栏最大化浏览器时)
onblur - 离开当前标签页时触发 (包括切换标签页,将浏览器最小化到任务栏时)
常用来配合 title 做一些操作
css
window.onfocus = function(){
    document.title = "tian大帅比的个人博客";
}

window.onblur = function(){
    document.title = "tian大帅比离开了";
}

//或者离开页面停止定时器
scroll事件
在窗口被卷动之后,就会触发scroll事件
可以使用window.onscroll或者window.addEventListener('scroll')来绑定事件处理函数
已卷动高度
window.scrollY属性表示在垂直方向已滚动的像素值
document.documentElement.scrollTop属性也表示窗口卷动高度
兼容写法
js
let scrollTop = window.scrollY || document.documentElement.scrollTop
注意
document.documentElement.scrollTop不是只读的,而window.scrollY是只读的
举例
html
<body style="height: 3000px;">
    <script>
        console.log(window.scrollY);
        console.log(document.documentElement.scrollTop);

        document.documentElement.scrollTop = 1000;
    </script>
</body>
Navigator 对象
window.navigator属性可以检索navigator对象,它内部含有用户此次活动的浏览器的相关属性和标识
Navigator代表当前浏览器的信息,通过该对象可以识别不同的浏览器。由于历史原因,Navigator对象中的大部分属性都已经不能帮助我们识别浏览器了。
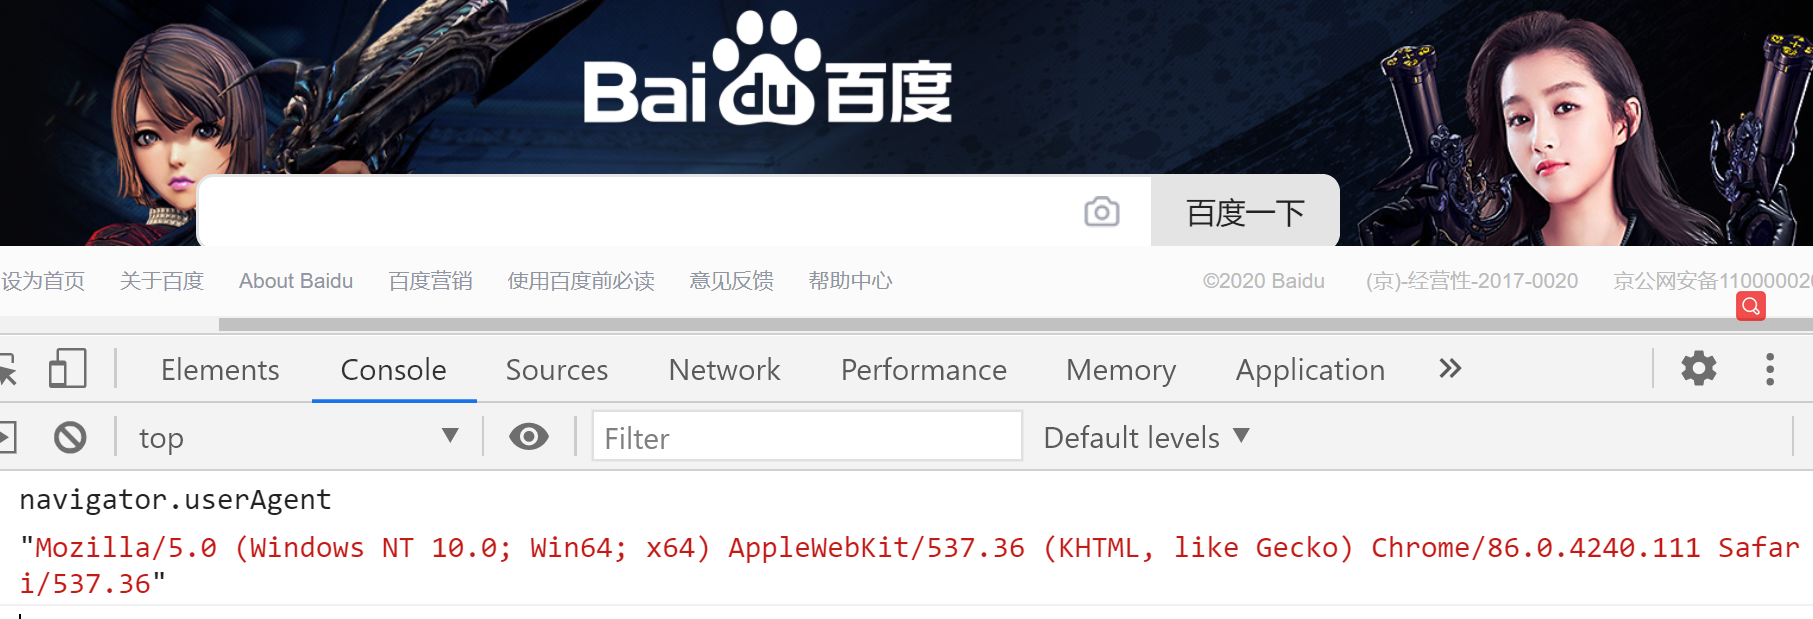
一般我们只会使用navigator.userAgent来获取浏览器的信息。userAgent 的值是一个字符串,简称 UA,这个字符串中包含了用来描述浏览器信息的内容,不同的浏览器会有不同的userAgent。
举例
js
console.log("浏览器的品牌" , navigator.appName);
console.log("浏览器的版本" , navigator.appVersion);
console.log("用户代理" , navigator.userAgent);
console.log("操作系统" , navigator.platform);
在电脑上模拟移动端浏览器
不同浏览器(包括微信内置的浏览器)的 userAgent 信息,是不一样的,我们可以根据
navigator.userAgent属性来获取。
比如说,我们在电脑浏览器上,按F12,然后在控制台输入navigator.userAgent,如下:
MacOS上的Chrome浏览器的 userAgent 是:

我们还可以在电脑浏览器的控制台里可以添加很多设备,通过这种方式,可以模拟移动端浏览器的场景,非常有用,请务必掌握。操作如下:
iOS 版微信浏览器:
css
Mozilla/5.0 (iPhone; CPU iPhone OS 9_3 like Mac OS X) AppleWebKit/601.1.46 (KHTML, like Gecko) Mobile/13E233 MicroMessenger/6.3.15 NetType/WIFI Language/zh_CN
Android 版微信浏览器:
css
Mozilla/5.0 (Linux; Android 5.0.1; GT-I9502 Build/LRX22C; wv) AppleWebKit/537.36 (KHTML, like Gecko) Version/4.0 Chrome/43.0.2357.121 Mobile Safari/537.36 MicroMessenger/6.1.0.78_r1129455.543 NetType/WIFI
iOS 版本QQ浏览器:
css
Mozilla/5.0 (iPhone; CPU iPhone OS 11_2_2 like Mac OS X) AppleWebKit/604.4.7 (KHTML, like Gecko) Mobile/15C202 QQ/7.3.5.473 V1_IPH_SQ_7.3.5_1_APP_A Pixel/1125 Core/UIWebView Device/Apple(iPhone X) NetType/WIFI QBWebViewType/1
Android 版 QQ浏览器:
css
Mozilla/5.0 (Linux; Android 4.4.2; PE-TL20 Build/HuaweiPE-TL20; wv) AppleWebKit/537.36 (KHTML, like Gecko) Version/4.0 Chrome/57.0.2987.132 MQQBrowser/6.2 TBS/043807 Mobile Safari/537.36 V1_AND_SQ_7.3.2_762_YYB_D QQ/7.3.2.3350 NetType/WIFI WebP/0.3.0 Pixel/1080
History对象
window.history对象提供了操作浏览器会话历史的接口
常用操作就是模拟浏览器回退按钮
方法1:
解释:用来回退到上一个页面,作用和浏览器的「回退按钮」一样。
js
history.back();//等同于点击浏览器的回退按钮
方法2:
解释:用来跳转下一个页面,作用和浏览器的「前进按钮」一样。
js
history.forward();
方法3:
解释:向前/向后跳转 n 个页面。
js
history.go( int n);  // 需要整数作为参数

// 代码举例:
history.go( 1 ); // 向前跳转一个页面,相当于 history.forward()

history.go( 2 ); // 表示向前跳转两个页面

history.go( 0 ); // 刷新当前页面

history.go( -1 ); // 向后跳转一个页面,相当于 history.back()

history.go( -2 ); // 向后跳转两个页面
js
<a href="javascript:history.back(); ">回退</ a>
备注:浏览器的前进按钮、后退按钮,在这个位置:

Location 对象
window.location标识当前所在网址,可以通过给这个属性赋值命令浏览器进行页面跳转
js
window.location = "https://www.baidu.com";
window.location.href = "https://www.baidu.com";

console.log(location.href); // 获取当前页面的url 路径
举例
html
<body>
    <input type="button" value="点我去看百度">
    <script>
        let oBtn = document.querySelector("input");

        oBtn.onclick = function(){
            window.location = "https:///www.baidu.com"; //加不加window都行
            window.location.href = "https:///www.baidu.com";
        }
    </script>
</body>
重新加载当前页面
可以调用location的reload方法以重新加载当前页面,参数true表示强制从服务器强制加载
html
<body>
    <input type="button" value="刷新">
    <script>
        let oBtn = document.querySelector("input");

        oBtn.onclick = function(){
          //   window.location.reload(); 重新加载当前页面。
            window.location.reload(true); //在方法的参数中传递一个true,则会强制清空缓存刷新页面。
        }
    </script>
GET请求查询参数
window.location.search属性即为当前浏览器的GET请求查询参数
js
比如网址https: //www.baidu.com/?a=1&b=2

console.log(window. location.search); // "?a=1&b=2"

//我们在访问网站的时候  网址上会以问号的形式带一些参数给服务器的脚本程序
BOM特效开发1
点击回到顶部
html
<style>
    body {
        height: 5000px;
        background-image: linear-gradient( to bottom,   green,    skyblue,  pink,   orange);
    }

    #backtotop {
        position: fixed;
        bottom: 100px;
        right: 100px;
        width: 80px;
        height: 80px;
        background-color: rgba(0, 0, 0, 0.4);
        cursor: pointer;
        text-align: center;
        line-height: 80px;
        color: #fff;
        user-select: none;
    }
</style>
</head>
<body>
    <div id="backtotop">回到顶部</div>

    <script>
        let backtotopBtn = document.getElementById("backtotop");
        let timer;

        backtotopBtn.onclick = function () {

            //设表先关
            clearInterval(timer);

            // 设置定时器
            timer = setInterval(function () {
                // 不断让scrollTop卷去的高度减少
                document.documentElement.scrollTop -= 50;

                //定时器要停
                if (document.documentElement.scrollTop <= 0) {
                    clearInterval(timer);
                }
            }, 20);
        };
    </script>
</body>
BOM特效开发2
DOM元素都有offsetTop属性,表示此元素到定位祖先元素的垂直距离
定位祖先元素:在祖先中,离自己最近的且拥有定位属性的元素
举例
html
<style>
    #wrap {
        width: 300px;
        height: 300px;
        border: 10px solid skyblue;
        margin: 100px auto 0;
    }

    #box {
        width: 100px;
        height: 100px;
        background-color: orange;
    }
</style>
</head>
<body>
    <div id="wrap">
        <div id="box"></div>
    </div>
    <script>
        let oBox = document.getElementById("box");

        // 净top值 使用这个属性的时候,所有祖先元素不要有定位.表示到页面顶端的举例
        console.log(oBox.offsetTop);
    </script>
开始开发
楼层导航小效果
html
<style>
    * {
        margin: 0;
        padding: 0;
    }
    ul {
        list-style: none;
    }
    section {
        width: 700px;
        margin: 0px auto 30px;
        background-color: rgba(0, 0, 0, 0.3);
        font-size: 50px;
        text-align: center;
        line-height: 200px;
        color: #fff;
    }

    #floornav {
        position: fixed;
        top: 200px;
        right: 100px;
        background-color: orange;
    }

    #floornav li {
        width: 50px;
        height: 50px;
        text-align: center;
        line-height: 50px;
        color: #fff;
        cursor: pointer;
    }
</style>
</head>
<body>
    <nav id="floornav">
        <ul id="list">
            <li data-n="科技">科技</li>
            <li data-n="人文">人文</li>
            <li data-n="体育">体育</li>
            <li data-n="视频">视频</li>
            <li data-n="娱乐">娱乐</li>
            <li data-n="新闻">新闻</li>
        </ul>
    </nav>

    <section style="height: 200px" data-n="科技">科技栏目</section>
    <section style="height: 300px" data-n="人文">人文栏目</section>
    <section style="height: 400px" data-n="体育">体育栏目</section>
    <section style="height: 500px" data-n="视频">视频栏目</section>
    <section style="height: 600px" data-n="娱乐">娱乐栏目</section>
    <section style="height: 700px" data-n="新闻">新闻栏目</section>

    <script>
        //使用事件委托给li添加监听
        let oList = document.getElementById("list");

        oList.onclick = function (e) {
            if (e.target.tagName.toLowerCase() == "li") {
                // getAttribute表示得到标签身上的某个属性值
                let n = e.target.getAttribute("data-n");
                //可以用属性选择器(就是方括号选择器)来寻找带有相同data-n的section
                let oSection = document.querySelector("section[data-n = " + n + "]");
                //让页面的卷动自动成为这个盒子的offsetTop值
                document.documentElement.scrollTop = oSection.offsetTop;
            }
        };
    </script>
</body>
继续完善点击变色
html
<!DOCTYPE html>
<html lang="en">
    <head>
        <meta charset="UTF-8" />
        <meta name="viewport" content="width=device-width, initial-scale=1.0" />
        <title>Document</title>
        <style>
            * {
                margin: 0;
                padding: 0;
                transition: 0.5s ease;
            }
            ul {
                list-style: none;
            }
            body {
                height: 5000px;
            }

            section {
                width: 700px;
                margin: 0px auto 30px;
                background-color: rgba(0, 0, 0, 0.3);
                font-size: 50px;
                text-align: center;
                color: #fff;
                transition: 0.5s ease;
            }

            #floornav {
                position: fixed;
                top: 200px;
                right: 100px;
                background-color: orange;
            }

            #floornav li {
                width: 50px;
                height: 50px;
                text-align: center;
                line-height: 50px;
                color: #fff;
                cursor: pointer;
            }

            #floornav li.active {
                background-color: hotpink;
                color: black;
            }
        </style>
    </head>
    <body>
        <nav id="floornav">
            <ul id="list">
                <li data-n="科技" class="active">科技</li>
                <li data-n="人文">人文</li>
                <li data-n="体育">体育</li>
                <li data-n="视频">视频</li>
                <li data-n="娱乐">娱乐</li>
                <li data-n="新闻">新闻</li>
            </ul>
        </nav>

        <section style="height: 400px" data-n="科技">科技栏目</section>
        <section style="height: 500px" data-n="人文">人文栏目</section>
        <section style="height: 600px" data-n="体育">体育栏目</section>
        <section style="height: 700px" data-n="视频">视频栏目</section>
        <section style="height: 800px" data-n="娱乐">娱乐栏目</section>
        <section style="height: 900px" data-n="新闻">新闻栏目</section>

        <script>
            //使用事件委托给li添加监听
            let oList = document.getElementById("list");
            let aLi = document.querySelectorAll("#list li");
            let aSection = document.querySelectorAll("section");

            let timer;

            oList.onclick = function (e) {
                if (e.target.tagName.toLowerCase() == "li") {
                    // getAttribute表示得到标签身上的某个属性值
                    let n = e.target.getAttribute("data-n");
                    //可以用属性选择器(就是方括号选择器)来寻找带有相同data-n的section
                    let oSection = document.querySelector("section[data-n = " + n + "]");
                    //让页面的卷动自动成为这个盒子的offsetTop值
                    document.documentElement.scrollTop = oSection.offsetTop;
                }
            };

            //在页面加载好之后,将所有的section盒子的offsetTop值推入数组
            let offsetArr = [];

            // 遍历所有的contentPart,将它们的净位置推入数组
            for (let i = 0; i < aSection.length; i++) {
                offsetArr.push(aSection[i].offsetTop);
            }

            // 为了最后一项可以方便比较,我们可以推入一个无穷大
            offsetArr.push(Infinity);
            // 当前所在楼层
            let nowFloor = -1;

            // 窗口卷动
            window.onscroll = function () {
                // 得到当前的窗口卷动值
                let scrollTop = document.documentElement.scrollTop;
                let i;
                // 遍历offsetTopArr数组,看看当前的scrollTop值在哪两个楼层之间
                for (i = 0; i < offsetArr.length; i++) {
                    if (scrollTop >= offsetArr[i] && scrollTop < offsetArr[i + 1]) {
                        break;
                    }
                }
                // 退出循环的时候,i是几,就表示当前楼层是几
                // 如果当前所在楼层,不是i,表示换楼了
                if (nowFloor != i) {
                    console.log(i);

                    // 让全局变量改变为这个楼层号
                    nowFloor = i;

                    // 设置下标为i的项有active
                    for (let j = 0; j < aLi.length; j++) {
                        if (i == j) {
                            aLi[j].classList.add("active");
                        } else {
                            aLi[j].classList.remove("active");
                        }
                    }
                }
            };

            console.log(aLi);
        </script>
    </body>
</html>
 tian~
tian~
